Categories
Apps Crypto

Xamarin & Metamask Mobile

NFT Gallery is going from strength to strength. One issue I have with it though is the user having to paste their Ethereum address into the wallet page. As anyone can paste any public wallet address, you can have anyones collection on your phone. So I have been thinking how to integrate Web3 tech into the app.

Web3 means cryptocurrencies, blockchain technology and the one problem is that it mostly lives in web browsers. Most people who use Ethereum access it via the Metamask browser plug in. In the mobile world you can’t really have plug ins and so Metamask exists as its own app, Metamask Mobile (or MMM for short). This lets you manage your accounts and interact with Dapps via the built in browser.

So how do you get two apps to talk to each other? The answer is deeplinks. MMM has a couple of deeplinks that allow you to trigger things in the app. One is to open a Dapp (or a website). The trick is to open a webpage in MMM, get the users Eth address and then trigger a deeplink back into your app. Luckily I know a smattering of Javascript and had played with deeplinks on a previous project.
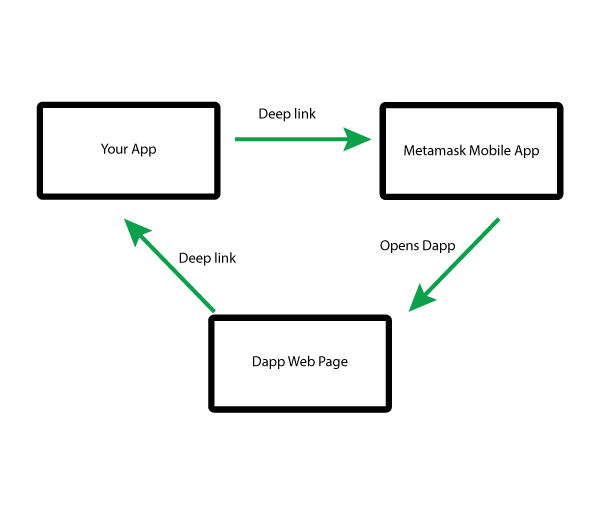
Deep link communication loop

First of all you create a web page on an https web server. Mine is here. The gist of it is that Metamask injects a javascript object called “ethereum” into the web page and the code interacts with that. Debugging it on the desktop was quite easy but in the app, it worked slightly differently. To debug you need to build your own debug version of MMM and remotely connect from the desktop to view your javascript. I got it working though.

To call MMM and get it to run your code you do something like this in c#.

await Browser.OpenAsync($"https://metamask.app.link/dapp/www.redfivesoftware.com/Web3Metamask.htm?return=http://" + AppName);

This opens a url on the device, which opens the deeplink into the app, which in turn opens your web page in the browser tab. In this case Web3Metamask.htm. Currently I pass one parameter in which is the start of the url that calls back to my app.

Then it is simply a case of overriding the OnAppLinkRequestReceived in your App class and processing the URI that was passed back into you.

    protected override void OnAppLinkRequestReceived(Uri uri)
    {
        Logger.Info(uri.AbsolutePath);

        string url = uri.AbsolutePath;

        var bits= url.Split("/",StringSplitOptions.RemoveEmptyEntries);

        switch (bits[0])
        {
            //{nftgallery:///address/0xce41b49d28800de3ba9925f68d82129dfc4b870b}
            case "address":
                string address = bits[1];
                App.SettingsViewModel.UserAddress = address;

                break;

            default:
                break;
        }

        base.OnAppLinkRequestReceived(uri);
    }

And now you have your eth address. In the next post I will show how to get details of NFTs from OpenSea using their API.

Categories
Crypto

Buying NFTs

Everyone is doing it, everyone is hopping on the NFT bandwagon. What is an NFT? In short it is a virtual thing that you buy, you can say you own and that you can sell afterwards. It has something to do with blockchains and is perfectly safe if you know what you are doing.

Buying

To buy and NFT you need some magical internet money. This is called Ethereum. You also need a wallet to keep your money in. You can buy Eth at a lot of different websites but the easiest way is to use Metamask. This is a Chrome browser plug in that lets you buy, send and receive Eth and acts as your username/password for any sites you will be visiting.

You could also use any of the following wallets. Fortmatic, WalletConnect, Coinbase Wallet and MyEtherWallet, but I haven’t personally used them.

Metamask

Once it is installed click on the little fox icon, set up and account and buy some Eth. Then back up your accounts “seed phrase”. With crypto, rather than have a username and password, you get assigned an address and a private key. You need both to things but if you forget one, there is no “forgot password?” feature.

Shopping

You have your money, so lets hit the shops. There are lots of them out there but the big ones are SuperRare, Rarible, NiftyGateway, MyBae, Makers Place, Known Origin and Async Art.

The sites selling NFTs all work the same way so lets look at Rarible. To buy something you have to first connect your wallet to the site. Click “Connect Wallet” in the top right and choose your wallet. Some windows will pop up asking if you wish to connect the two things together. You may be asked to “sign” things, which is their way of getting you to click ok.

Once signed in you may have a profile you can set up with name and avatar, etc. Again this usually involves you signing something, just to prove it is actually you.

Once that is done you can look for things to buy. There is art, virtual real estate, trading cards, business things, Cryptokitties. You name it.

Buying

Once you have found something you like, you click the buy button. Some things go to auction and some have a “buy now” facility. We will assume the latter. Again some windows should pop up asking you to sign things but watch out.

Fees

Most of the signing has been free so far but when you come to make the purchase there will be fees. As of writing this, the cost of buying and NFT is the price of the NFT plus $70. So if you are buying a Pepe meme for $20 you will end up paying $90 in total. Whether you still want to buy NFTs after that is up to you.

Viewing

Now you have your NFT, what can you do with it? Well, the most obvious thing to do is look at it. You can view it on your computer screen but you can also access it on your phone. Nft Gallery is an app for iOS and Android that syncs with your Ethereum wallet and lets you view, collect and cast your NFTs.

Categories
Crypto

Creating NFTs

On the back of the cryptocurrency boom, NFTs are currently all the rage. It is a catch all name for something that can have a lot of different uses. I have been dabbling in the #CryptoArt space for a year now and have exhibited and sold a few bits. It is a confusing world so I thought I would knock up a quick guide to making your own NFTs.

Get some Ethereum

The first step is to get some Ethereum. There are lots of ways to do this but I guess the easiest way would be to buy some straight into Metamask. MetaMask is a wallet for keeping your magic internet money in so it makes sense to deposit it straight into there. It is a browser extension so install it in chrome, click the little fox icon and explore it. The next two steps are

  • Buy some Ethereum.
  • Back up yor wallet.
  • Back up yor wallet again.

Did I mention backing up your wallet? That wallet address thing is your identity from now on, so if you lose access to it you lose anything in it. There is no way of resetting you password or anything like that.

Pick a Website

There are many places to create (or”mint”) your art, but the big ones are SuperRare, Rarible, NiftyGateway, MyBae, Makers Place, Known Origin and Async Art.

It is worth noting that some are like proper art galleries where you are vetted and can only create if you are accepted by them. These normally require some sort of background check and video introduction. Some are more like copy shops where anyone can mint anything they like.

Mint your art

Once you have found a site you like, you shoudl join it. See the post Buying NFTs for more details on joining a website. The jist in you link your ethereum wallet to the site and use that as your username and password.

Next get your artwork. This must be 100% your own creation. It can be an image, video, song or some other sort of thing. If the image is big (or it is an mp3, etc) then it is good to have a thumbnail. This can be average size as this is what is usually displayed.

Next click the “create” button. Give it a name and a description. Your first choice is to mint a single or a multiple. There is only one Mona Lisa which makes it rare and valuable. If you just want to get your name out though, do a multiple of 50 and give them away. If you are doing several related pieces, then you can give them a Collection Name, otherwise they get assigned to the website you mint them on.

You can give it proerties but they are only really used for things like trading game cards. You can set a royalty. This is how much of future sales of that NFT go back to you. Finally some let you set a “buy now” price. If you don’t do this then it goes into an auction where peole can bid on it.

Finally you hit the “create Item” button and it mints your NFT. For a price. Your wallet will pop up a few message boxes asking you to sign things. One of these will include the fees for the minting. Warning, these can be high. It may cost you $70 to mint something that costs $50. In which case you are going to lose money. It is worth keeping the maths in mind when you come to this stage.

Viewing your NFT

Now you have your NFT, what can you do with it? Well, the most obvious thing to do is look at it. You can view it on your computer screen but you can also access it on your phone. Nft Gallery is an app for iOS and Android that syncs with your Ethereum wallet and lets you view, collect and cast your NFTs.